Git crash course
Important
Remember that git is optionnal in this project. It is perfectly OK to not use git and use another approach if you ever need to synchronize your files.
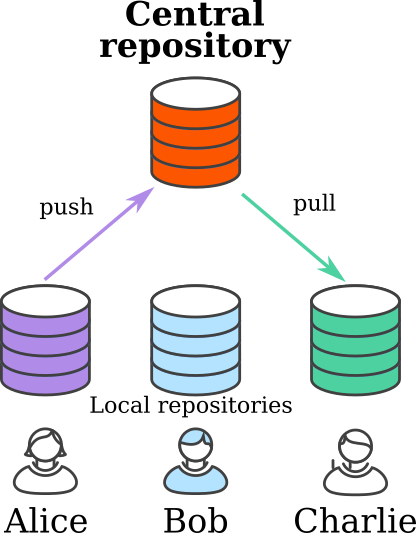
Git is a wonderful tool to share some text between several computers, while keeping track of the history of changes. This is incredibly useful when working as a team on a programming project: when one team member modifies a file (to add a feature), it clearly documents the change. They then pushes these changes on a shared project, from which others can get these change. They do so by synchronizing their local version with the shared project.
In the git parlance, each teamate has a local repository, a given change is a commit (some modifications to the files + a description of these changes), while synchronizations can be either push or pull, depending whether you send local changes to a remote repository or get remote commits to your local repository.
Git is so useful that I routinely use it on projects where I’m the only programmer. Even if I don’t have to synchronize with remote computers, I like the ability to build my software incrementally by adding one commit after another. When things go wrong, I can go back to a previous working commit, just like you go back to the previous checkpoint when you lose in a video game.
This page only shows the minimal commands that you need. It does not show the full power of git, but hopefully will help you getting started with git.
Configuring your account on GitLab
A single configuration is mandatory to use our academic hosting system (ISTIC gitlab) from your computer. First log into our this system using your academic credentials. Go to your preference (click on the round icon on the very top right corner), then “SSH keys” on the left and follow the instructions to generate a key on your computer (don’t use a passphrase). Once generated, copy/paste the content of the public part of your key to the GitLab preference box.
Getting your copy of the retrogames
You are not allowed to modify the template available online, so you first need to dupplicate it on ISTIC’s gitlab, and then you need to get a local copy on your disk. In the git parlance, you need to fork my repository on gitlab, and then clone your fork onto your local computer.
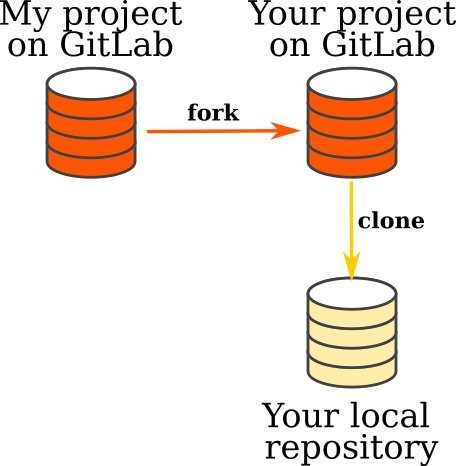
The difference between clone and pull is that clone is creating a local repository after a remote one while pull is only copying commits between compatible repositories.
In practice, go to the project you want to fork, clic on the “fork” button to the right of the project name and follow the instructions to make a private project.
Once you have your own fork, clic on the big blue “Clone” button and select the ssh URL. Then, the following in a terminal:
git clone #the URL of your project# retrogames
If your name is GIZMODO, you will probably type the following:
git clone git@gitlab.istic.univ-rennes1.fr:GIZMODO/template-retrogames.git retrogames
If you want to share your work with a teamate (once you have a teamate), add this person as a project member on GitLab (they will get a mail to confirm). After clicking on the received link to confirm, they can clone your repository just as you did above.
Editing a file
Edit the file README.md on your local copy to add your name on top.
Verify the change you did by typing git diff. This lists all
changes, line by line. In this output, lines starting with a - are
removed by the change while lines starting with a + were added.
For example, the following output simply means that I changed the
first line of the file, changing Retrogames template files into
Retrogame, by me. The other lines (starting with a space) are
unchanged by this edition. You can safely ignore the lines on top.
$ git diff
diff --git a/README.md b/README.md
index 5dcb136..dcf375f 100644
--- a/README.md
+++ b/README.md
@@ -1,4 +1,4 @@
-# Retrogames template files
+# Retrogame, by me

 This is the student's starter kit for the Retrogaming project (https://mquinson.frama.io/retrogames).
 It contains all you need to start working on your project.
Creating a commit
To send this change to your project, you first need to create a commit with the following command.
git commit -m "Add my name" README.md
Here, git commit is what you want to do (create a git commit),
-m "Add my name" documents the commit (ie, the string Add my
name will be used as a documentation to the change introduced, and
finally README.md asks git to only consider the changes of that
file.
Typing git diff again yields no output, because there is no file
edition that is not already commited to your repository.
Git will refuse to commit changes to files it does not track, so you need to add new files before you can commit them.
# create mygame.py on disk
git commit -m "something" mygame.py # This is an error

git add mygame.py # now git knows about this file
git commit -m "something" mygame.py # OK
Synchronizing your repository
Once you’ve created a commit, you need to explicitly send it to the GitLab project as follows:
git push
Your colleagues (if any) need to explicitly pull this commit from the GitLab project as follows:
git pull
Going further
There is much (much) more to say about git and gitlab, but you now have the basics to get things done. Congratuations! But don’t get fooled. Git is a powerful (and often tricky) tool.
You will find many tutorials on the internet. The one from Atlassian is very good and very complete. Thomas Genet (our colleague at Rennes) provide a very good one in French (associated video). There is even a little game that you can play in your browser to learn to use git.